|

Automated Inspection of components using
State-of-the-Art infrared sensors and
the latest machine vision technology
The Infrared radiation has been studied for well over a century. It has
only been the last fifty years since the science has lead to the development of
sensors that are economical enough for use in industrial applications.
Today infrared sensors are used as the tool of choice for the detection of over
heated circuit, mechanical wear, voids or leaks in roofs, poor barrier seals,
and many more applications. Phoenix Imaging's Infraredia
group is dedicated to the advancement of automated inspection systems using
infrared sensor technology. The Infraredia group has been implementing
infrared (IR)
inspection systems for over twenty years in a wide range of applications from
simple automotive backlight inspection of defroster circuits to advanced
vibro-thermography applications to identify cracks in die-cast or powder metal
components. Among the many industrial uses of infrared sensors the most
popular for our customers include:
·
Spotweld
evaluation to measure nugget (fused area) size.
·
Splits or
tears in sheet metal parts.
·
Laminations,
hot tears, and folds in cast aluminum and magnesium parts.
·
Cracks in
tools and support brackets.
·
Cracks in
gears.
·
Adhesive
bond evaluation.
·
Discrepant
product.
·
Weld
evaluation / inspection.
·
Cracks in
chain links.
·
Cracks in
forged and cast iron products.
There are several different techniques that are applicable to infrared
inspection. The most common is passive infrared inspection in which the
component being examined is observed in a natural state during the production
cycle. Examples of this type of inspection would be components of
different temperatures, thermal energy added during the manufacturing process,
thermal energy added during the washing or drying process. Active infrared
inspection requires that thermal, electrical or magnetic energy is added to the
components in order to perform the testing procedure. Active infrared
inspection examples would include supplying current to an electrical circuit,
adding thermal energy to castings to highlight surface voids, or to excite a
laminate with a heat pulse. There is one additional Active technique that
converts mechanical energy to thermal energy called Vibro-Thermography, more on
this topic later.
A few examples of how infrared technology can be applied are show below:
|
|

|
|
Component placement in mold
|
|

|
|
Verify Component Presence
|
|

|
|
Non-uniform Pre-heat Operation
|
|

|
|
Hot Spots in Material
|
|

|
|
Defective Heater Element
|
|
|
|

|
|
Foam Presence in Frame
|
|

|
|
Non-uniform Casting Profile
|
|

|
|
Isolation of poor weld condition
|
|

|
|
Mirror Heating Profile
|
|

|
|
Non-uniform Heating Profile
|
|
|
|

|
|
Defective Laddle Liner
|
|

|
|
Complete Die Cast Integrity
|
|

|
|
Cracks in fuel pump casting
|
|

|
|
Isolation of Surface Defects
|
|

|
|
Cracks in pump body
|
|
|
|

|
|
Raw IR image of defective electronic circuit
|
|

|
|
Enhanced IR image of narrow trace on electronic circuit
|
|
|
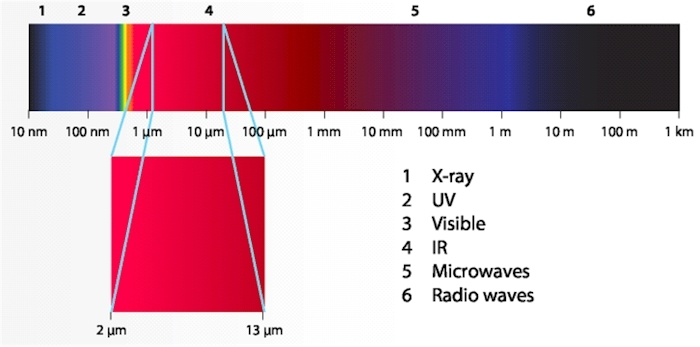
The electromagnetic spectrum (Background Information)
The electromagnetic
spectrum is divided arbitrarily into a number of wavelength regions, called
bands, distinguished by the methods used to produce and detect the radiation.
There is no fundamental difference between radiation in the different bands of
the electromagnetic spectrum. They are all governed by the same laws and the
only differences are those due to differences in wavelength. Thermography
makes use of the infrared spectral band. At the short-wavelength end the
boundary lies at the limit of visual perception, in the deep red. At the
long-wavelength end it merges with the microwave radio wavelengths, in the
millimeter range.
The name means below red, the Latin infra meaning "below". Red is
the color of the longest wavelengths of visible light. Infrared light
has a longer wavelength (and so a lower frequency) than that of red
light visible to humans, hence the literal meaning of below red.
The infrared
band is often further subdivided into four smaller bands, the boundaries
of which are also arbitrarily chosen. They include: the near infrared
(0.75–3 µm), the middle infrared (3–6 µm), the far infrared (6–15 µm)
and the extreme infrared (15–100 µm). Although the wavelengths are given
in µm (micrometers), other units are often still used to measure
wavelength in this
spectral
region, e.g. nanometer (nm) and
Ĺngström (Ĺ).
The
relationships between the different wavelength measurements is:
10,000 Ĺ =
1,000 nm = 1 µm
In addition,
the International Commission on Illumination (CIE) recommended the
division of optical radiation into the following three bands:
- IR-A: 700 nm–1400 nm (0,7 µm – 1.4 µm)
referred to as: Near-infrared
- IR-B: 1400 nm–3000 nm (1.4 µm – 3 µm)
Near-infrared to Middle-infrared
- IR-C: 3000 nm–1 mm (3 µm – 1000 µm)
Mid-Range to Far-infrared

The Electro-magnetic Spectrum
Although the automated inspection
industry and quality control departments consider the visible spectrum
as the primary inspection tool, the infrared spectrum offer many
opportunities. Consider the EM spectrum illustrated above, notice
that the IR spectrum is much larger than the visible spectrum.
When using automated inspection equipment the sensor acquires data, not
the human eye. There are a range of IR sensors available for each
the IR divisions listed above. The task of selecting the proper IR
sensor for the application should be left to the expects that implement
the technology on a regular basis. Infraredia has the experience
to insure that your infrared application is engineered and implemented
correctly.
| 


